Revision:
Tessellating Patterns (2270)
Compass Directions (2426)
Compass Directions a (2590)
Compass Directions 2 (2592)
Grid Coordinates (2422)
Describing Transformations (2423)
Line Symmetry (2266)
Rotational Symmetry (2648)
Enlargement (2649)
Combinations of Transformations (2647)
Point Coordinates (2424)
Plotting Coordinates (2524)
The Cartesian Plane (2525)
The Axis of Symmetry (3288)
Transformations: Reflections (3289)
Transformations: Rotations (3291)
Transformations: Translations (3290)
Rotational Symmetry (3292)
Lesson 10
LI: We are learning to understand the Cartesian coordinate system.
SC: I can plot coordinates on the Cartesian Plane.
SC: I can plot coordinates on the Cartesian Plane.
Group 1: Logan, Jarvis, Nakita, Erika, Cam, Tahlia & Owen
If finished early, start revising areas you feel you need to go over, using Maths Online:
Tessellating Patterns (2270)
Compass Directions a (2590)
Compass Directions 2 (2592)
Grid Coordinates (2422)
Describing Transformations (2423)
Line Symmetry (2266)
Rotational Symmetry (2648)
Enlargement (2649)
- Finish Blackbeard’s Bounty task (From Yesterday)
If finished early, start revising areas you feel you need to go over, using Maths Online:
Tessellating Patterns (2270)
Compass Directions a (2590)
Compass Directions 2 (2592)
Grid Coordinates (2422)
Describing Transformations (2423)
Line Symmetry (2266)
Rotational Symmetry (2648)
Enlargement (2649)
Group 2 & 3 Introduction:
Group 2: Jayda, Sarah, Aiden, Kya, Em. B, Paddy, Josh, Jess, Jack, Emily. F, Jade, James, Daniel, Matilda & Connor,
Today you are going to use your understanding of the Cartesian Plane to complete some Halloween pictures. As you plot each point you will need to cross off co-ordinates from your instructions so that you know where you are up to. I will print a copy of the final picture (ie: the answers) so you have an idea of what your picture should start to look like.
Revision:
Group 3: With Mr Blain
Jess, Jack, Emily. F, Jade, James, Daniel, Matilda, Connor,
Jess, Jack, Emily. F, Jade, James, Daniel, Matilda, Connor,
Activity:
coordinates of shapes that have been transformed on the cartesian plane
NB: The worksheet calls the original shape the pre-image, and the new shape is referred to as the image.
Instructions:
1. Each worksheet is divided into two sections. The top half is for partner A,
the bottom half for partner B.
2. Half of the group gets A, the other half gets B.
3. Students graph and label the original shape and the image on their own. Using
colored pencils students shade in the image. (The SECOND shape you create!)
4. Once complete, compare with your partner, who did the other half of the worksheet. (So, if you did problem A, they did B). The shaded images are the in
the same locations for each problem.
5. Students can check their work and talk about each one. If they have figures
in different places, students should talk it out and figure out which answer is
correct.
Reflection:
Remind yourself what your goal was for this unit of work. What is your level of understanding now, of that particular goal?
Remind yourself what your goal was for this unit of work. What is your level of understanding now, of that particular goal?
Lesson 9
LI: We are learning to understand the Cartesian coordinate system.
SC: I can plot coordinates on the Cartesian Plane.
SC: I can plot coordinates on the Cartesian Plane.
Group 1: Logan, Jarvis, Nakita, Erika, Cam, Tahlia &Owen
Blackbeard’s Bounty
In this investigation, you will imagine that you are a famous pirate living in the year 1700. During a recent expedition in the Caribbean, you have managed to obtain a map (and accompanying set of directions) leading to the infamous ‘Blackbeard’s Bounty’ – a treasure filled with riches beyond any pirate’s wildest dreams! You must create a comprehensive map of the island where Blackbeard’s Bounty is buried, write a list of numbered directions from a starting point on the island to the treasure’s location, then swap your map and list of directions with a friend. Hopefully, their directions will accurately lead to the treasure!
Group 2: Jess, Jack, Emily. F, Jade, James, Jayda, Connor, Matilda, Daniel, Sarah, Aiden, Kya, Em. B
You are going to watch the video "The Cartesian Plane- 2525" on Maths Online while I introduce Group 1 to their task for today.
Let’s have a look at the four quadrants. What information do you notice on this picture? (Could enlarge this and use as an anchor chart).
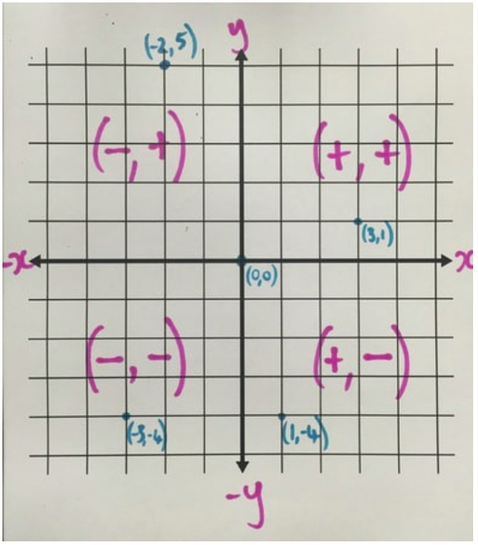
Create a similar picture using this blank template.
You need to label each quadrant, and plot some extra points of your own.
Then: Cartesian Plane Bingo
You can play individually if confident, otherwise in pairs.
Before starting, let just quickly look at p. 2 with the animal index, in case we are unsure of any of the animals!
Preparation beforehand:
You will need to download this presentation to play on IWB.
Per student (or pair!) you will need to print from this bingo resource
REFLECTION:
Picture reflections - how do you feel about your learning today? Refer back to LI & SC when reflecting.
You need to label each quadrant, and plot some extra points of your own.
Then: Cartesian Plane Bingo
You can play individually if confident, otherwise in pairs.
Before starting, let just quickly look at p. 2 with the animal index, in case we are unsure of any of the animals!
Preparation beforehand:
You will need to download this presentation to play on IWB.
Per student (or pair!) you will need to print from this bingo resource
- bingo card, (print any pages from p. 12 - 26. Each page has two bingo cards)
- coordinate grid with animals: p. 3
REFLECTION:
Picture reflections - how do you feel about your learning today? Refer back to LI & SC when reflecting.
Lesson 8
Lesson 8
LI:We are learning to use directional language and landmarks to describe routes.
SC: I can create and follow instructions using directional language to successfully locate symbols placed around Mandama.
LI:We are learning to use directional language and landmarks to describe routes.
SC: I can create and follow instructions using directional language to successfully locate symbols placed around Mandama.
Introduction:
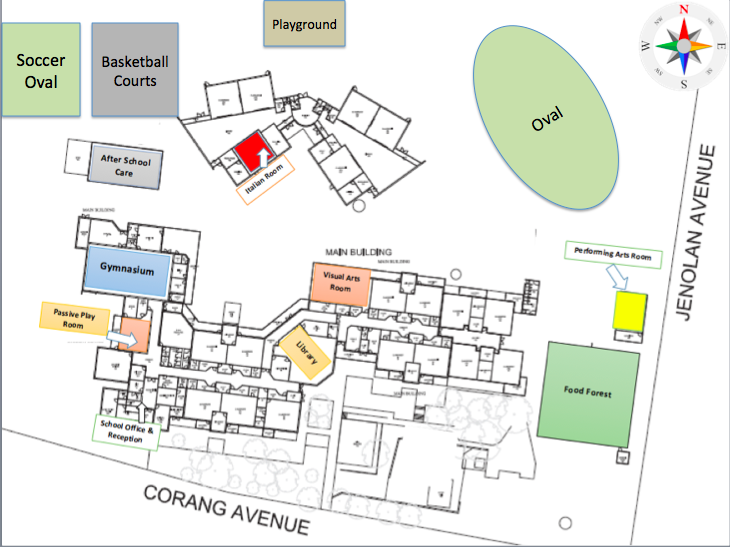
Let’s have a quick look at this map of Mandama
Let’s practise giving instructions that use directional language to take us to a particular location around the school. Eg: Exit the BER from the main doors. Walk in a Southerly direction until you find stairs. Go up the stairs. Turn left.
Let’s have a quick look at this map of Mandama
Let’s practise giving instructions that use directional language to take us to a particular location around the school. Eg: Exit the BER from the main doors. Walk in a Southerly direction until you find stairs. Go up the stairs. Turn left.
Activity:
Today you will be working with a partner and creating a mini “Mandama Amazing Race”. You will each receive a set of symbols and some blutack.
STEP 1: WIth your partner use ONE copy of the map of Mandama to mark where you will place your six symbols, in the yard. (NB: You are not allowed to completely hide them!!! If somebody approaches the place where you have chosen to put your symbol, the symbol should be directly visible at a height reachable for Grade ⅚ students to grab without anything having to be moved.)
STEP 2: Once you have chosen your locations, you need to write a list of directions leading another pair of students to find your symbols. Remember: you must use a combination of left/right directions, as well as some compass directions (eg: South-West).
STEP 3: Show your directions to your teacher.
STEP 4: Go outside and stick your symbol in your marked locations. USE YOUR DIRECTIONS while you do this, to check that they make sense! Fix up anything that needs it.
Finished? Straight back to the classroom. Your teacher will tell you what to go on with while you wait for other pairs to finish.
Once every pair is finished hiding their stars, it will be time to swap instructions! Before going outside though:
STEP 5: Read the instructions carefully with your partner and use your second copy of the map of Mandama to mark the locations that you think the symbols are hidden in.
STEP 6: Once you think you have marked the 6 locations correctly on the map, show this to the students who hid the symbols. If they think you are on the right track you can go outside and get hunting! Remember: Make sure you know what colour symbols you are looking for (and be warned: you might have light blue but another group might have dark blue - you will need to be specific about what you are looking for!)
Groups:
Lesson 7
LI: We are learning to use a grid reference system.
SC: I can find and describe locations on a map using coordinates, saying the letter first, then the number.
SC: I can find and describe locations on a map using coordinates, saying the letter first, then the number.
Introduction:
Let’s have a look at this map of the Waurn Ponds Shopping Centre.
** It is important to make sure that you reference the letter first. No brackets are required for this.
Which shop is located at D12?
Who would like to ask the class some other questions like that one, using the coordinates on this map?
Today some of you will have the opportunity to play battleships! I am going to show you how to play before you go, so that when you finish your activity you will know what to do.
Battleships
Activities:
Group 1: With Mr Blain
Jarvis, Logan, Nakita, Em. B, Owen, Sarah, Cam & Josh
using this worksheet.
& then Battleships
Group 2:
Jayda & Matilda
Connor & Kya
Aiden & Paddy
Erika & Tahlia
Play Battleships
Group 3:
Jack, Jess, Emz, Jade, James, Daniel
Mini Murder Mystery Co-ordinates activity. Work in pairs to solve.
http://bit.ly/29tnwSV
& then Battleships
Reflection:
What do you think are the most important things we need to remember about reading coordinates?
Lesson 6
LI:We are learning to use directional language and landmarks to describe routes.
SC: I can create and follow instructions using directional language to successfully create and follow a planned route around Geelong or Victoria.
SC: I can create and follow instructions using directional language to successfully create and follow a planned route around Geelong or Victoria.
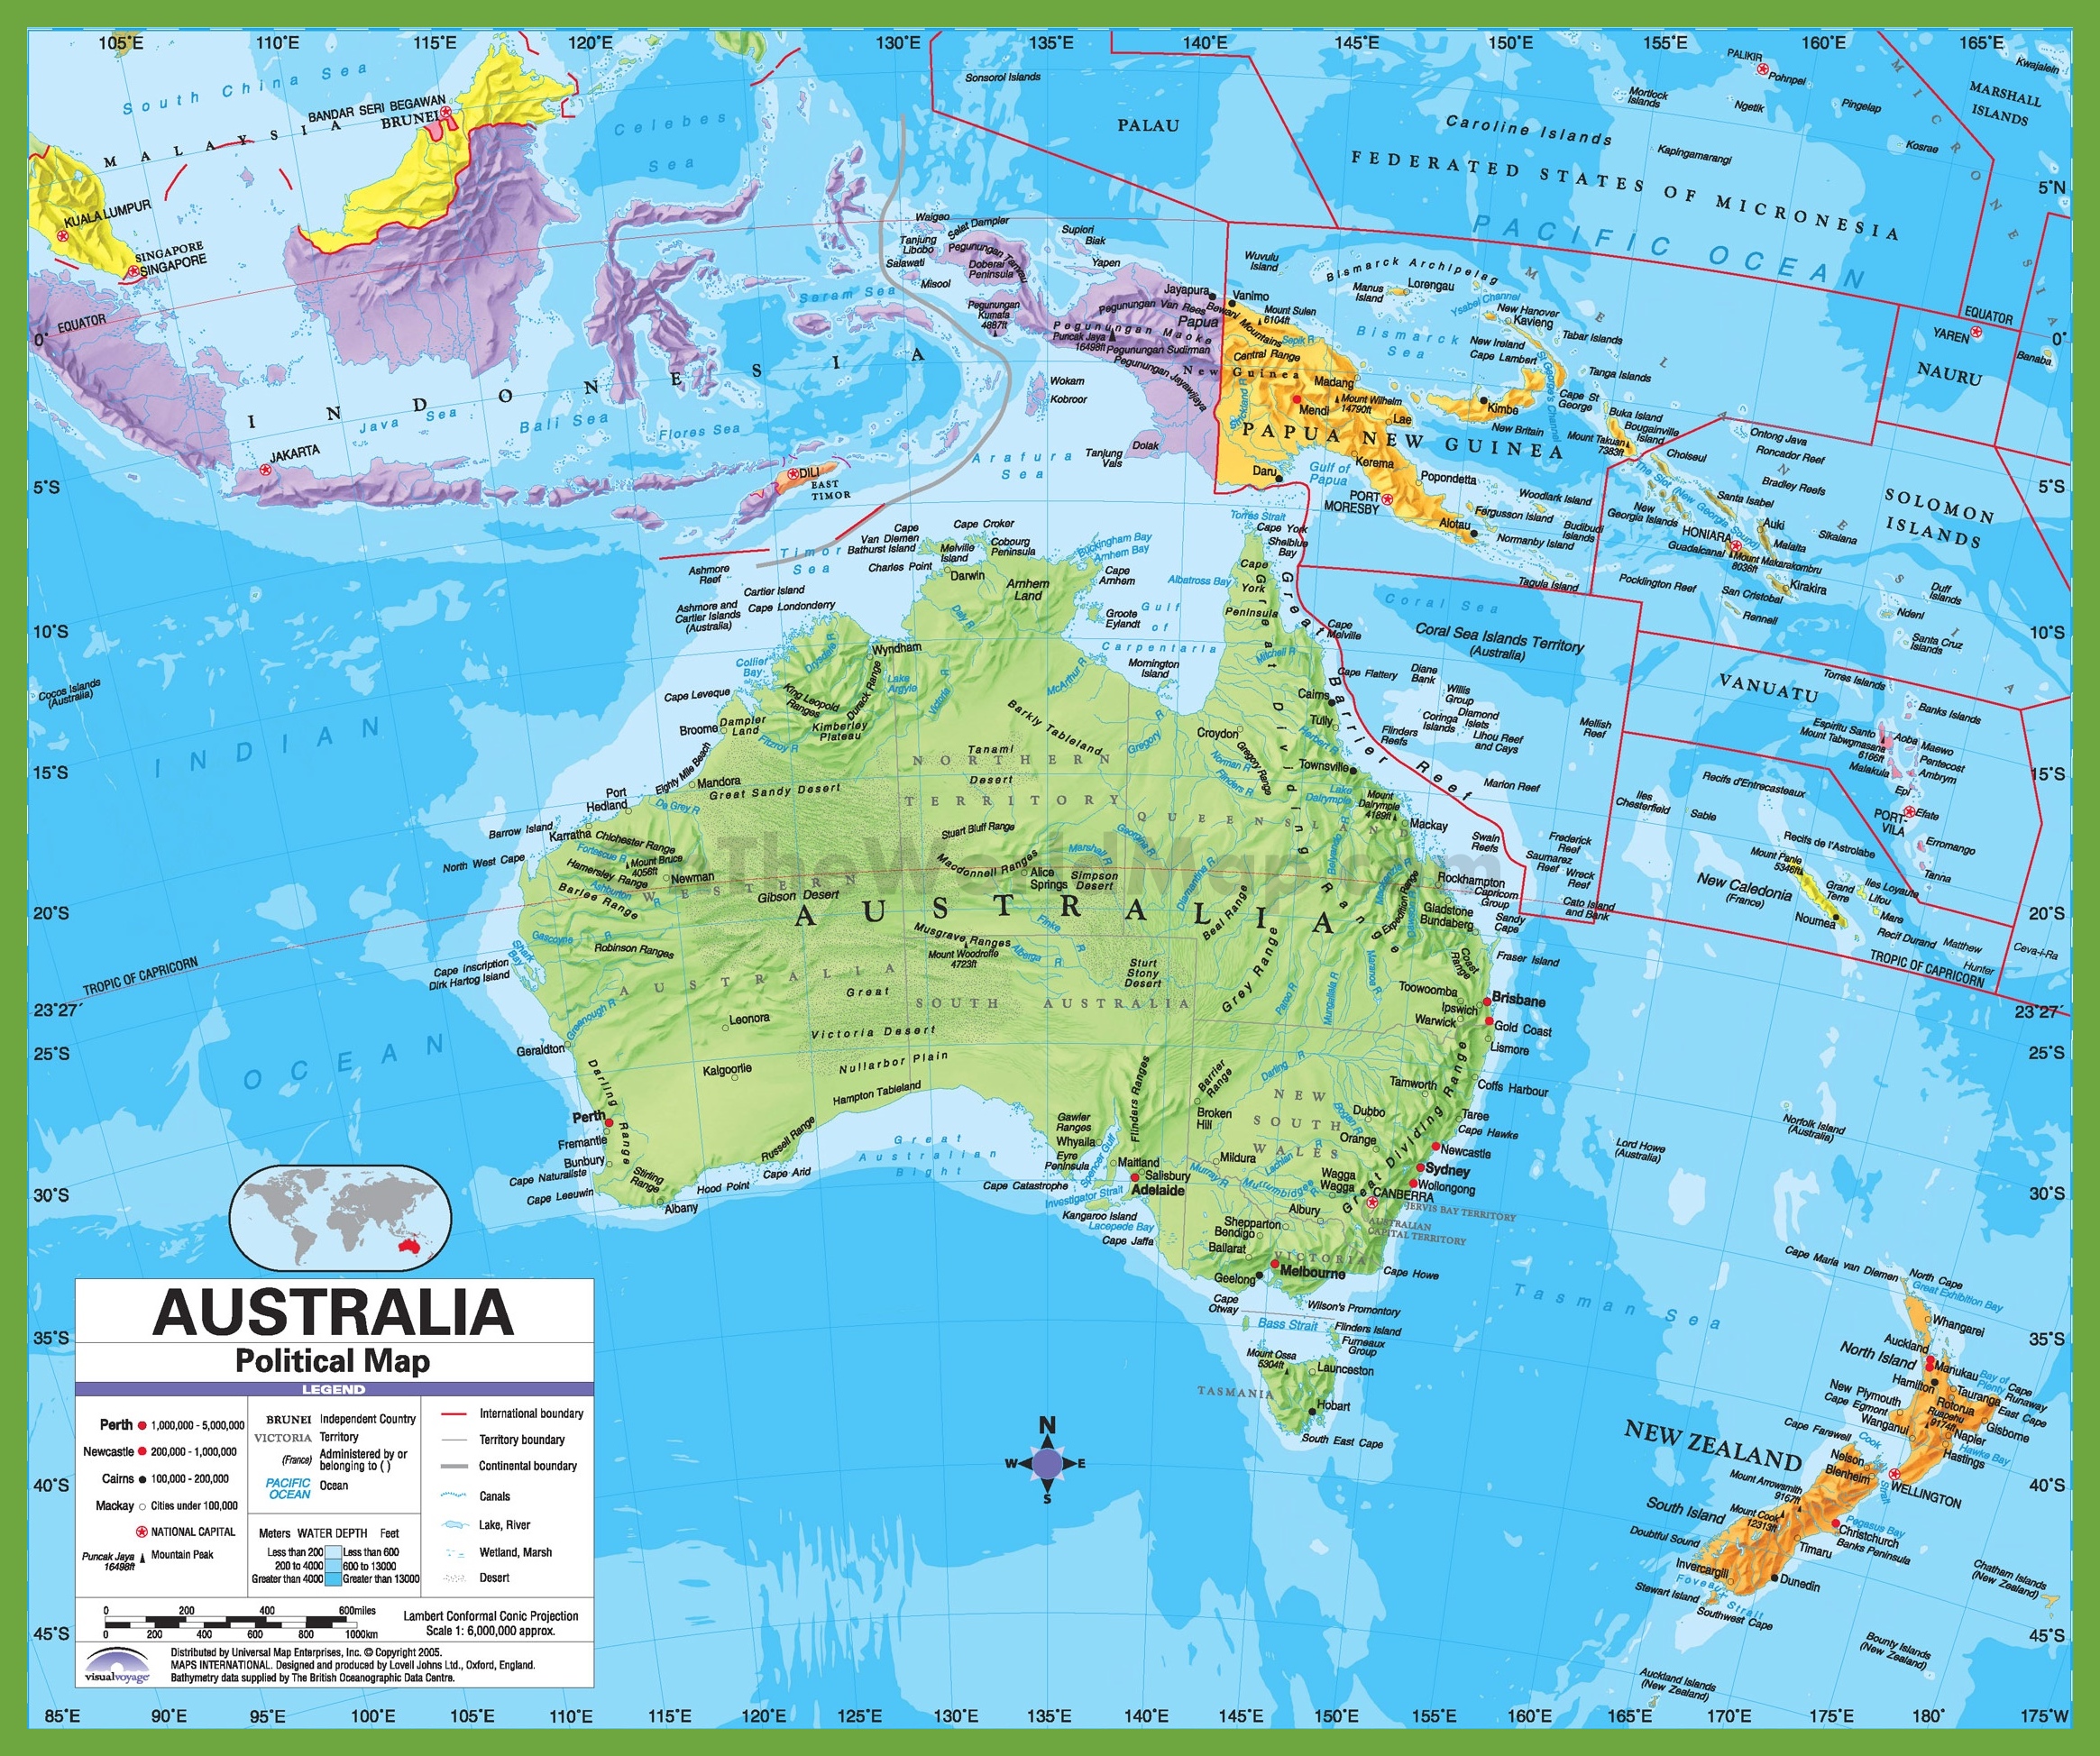
Let’s look at this map of Australia & surrounding countries:
http://ontheworldmap.com/australia/political-map-of-australia.jpg
We will solve these questions together:
Let’s have a look at the scale - how can we work out the distance between these places?
http://ontheworldmap.com/australia/political-map-of-australia.jpg
We will solve these questions together:
- What direction is Broome, WA, from Geelong, Vic?
- What direction is Canberra, ACT, from Perth, WA?
- What direction is Jakarta, Indonesia, from Port Moresby, PNG?
Let’s have a look at the scale - how can we work out the distance between these places?
Activity:
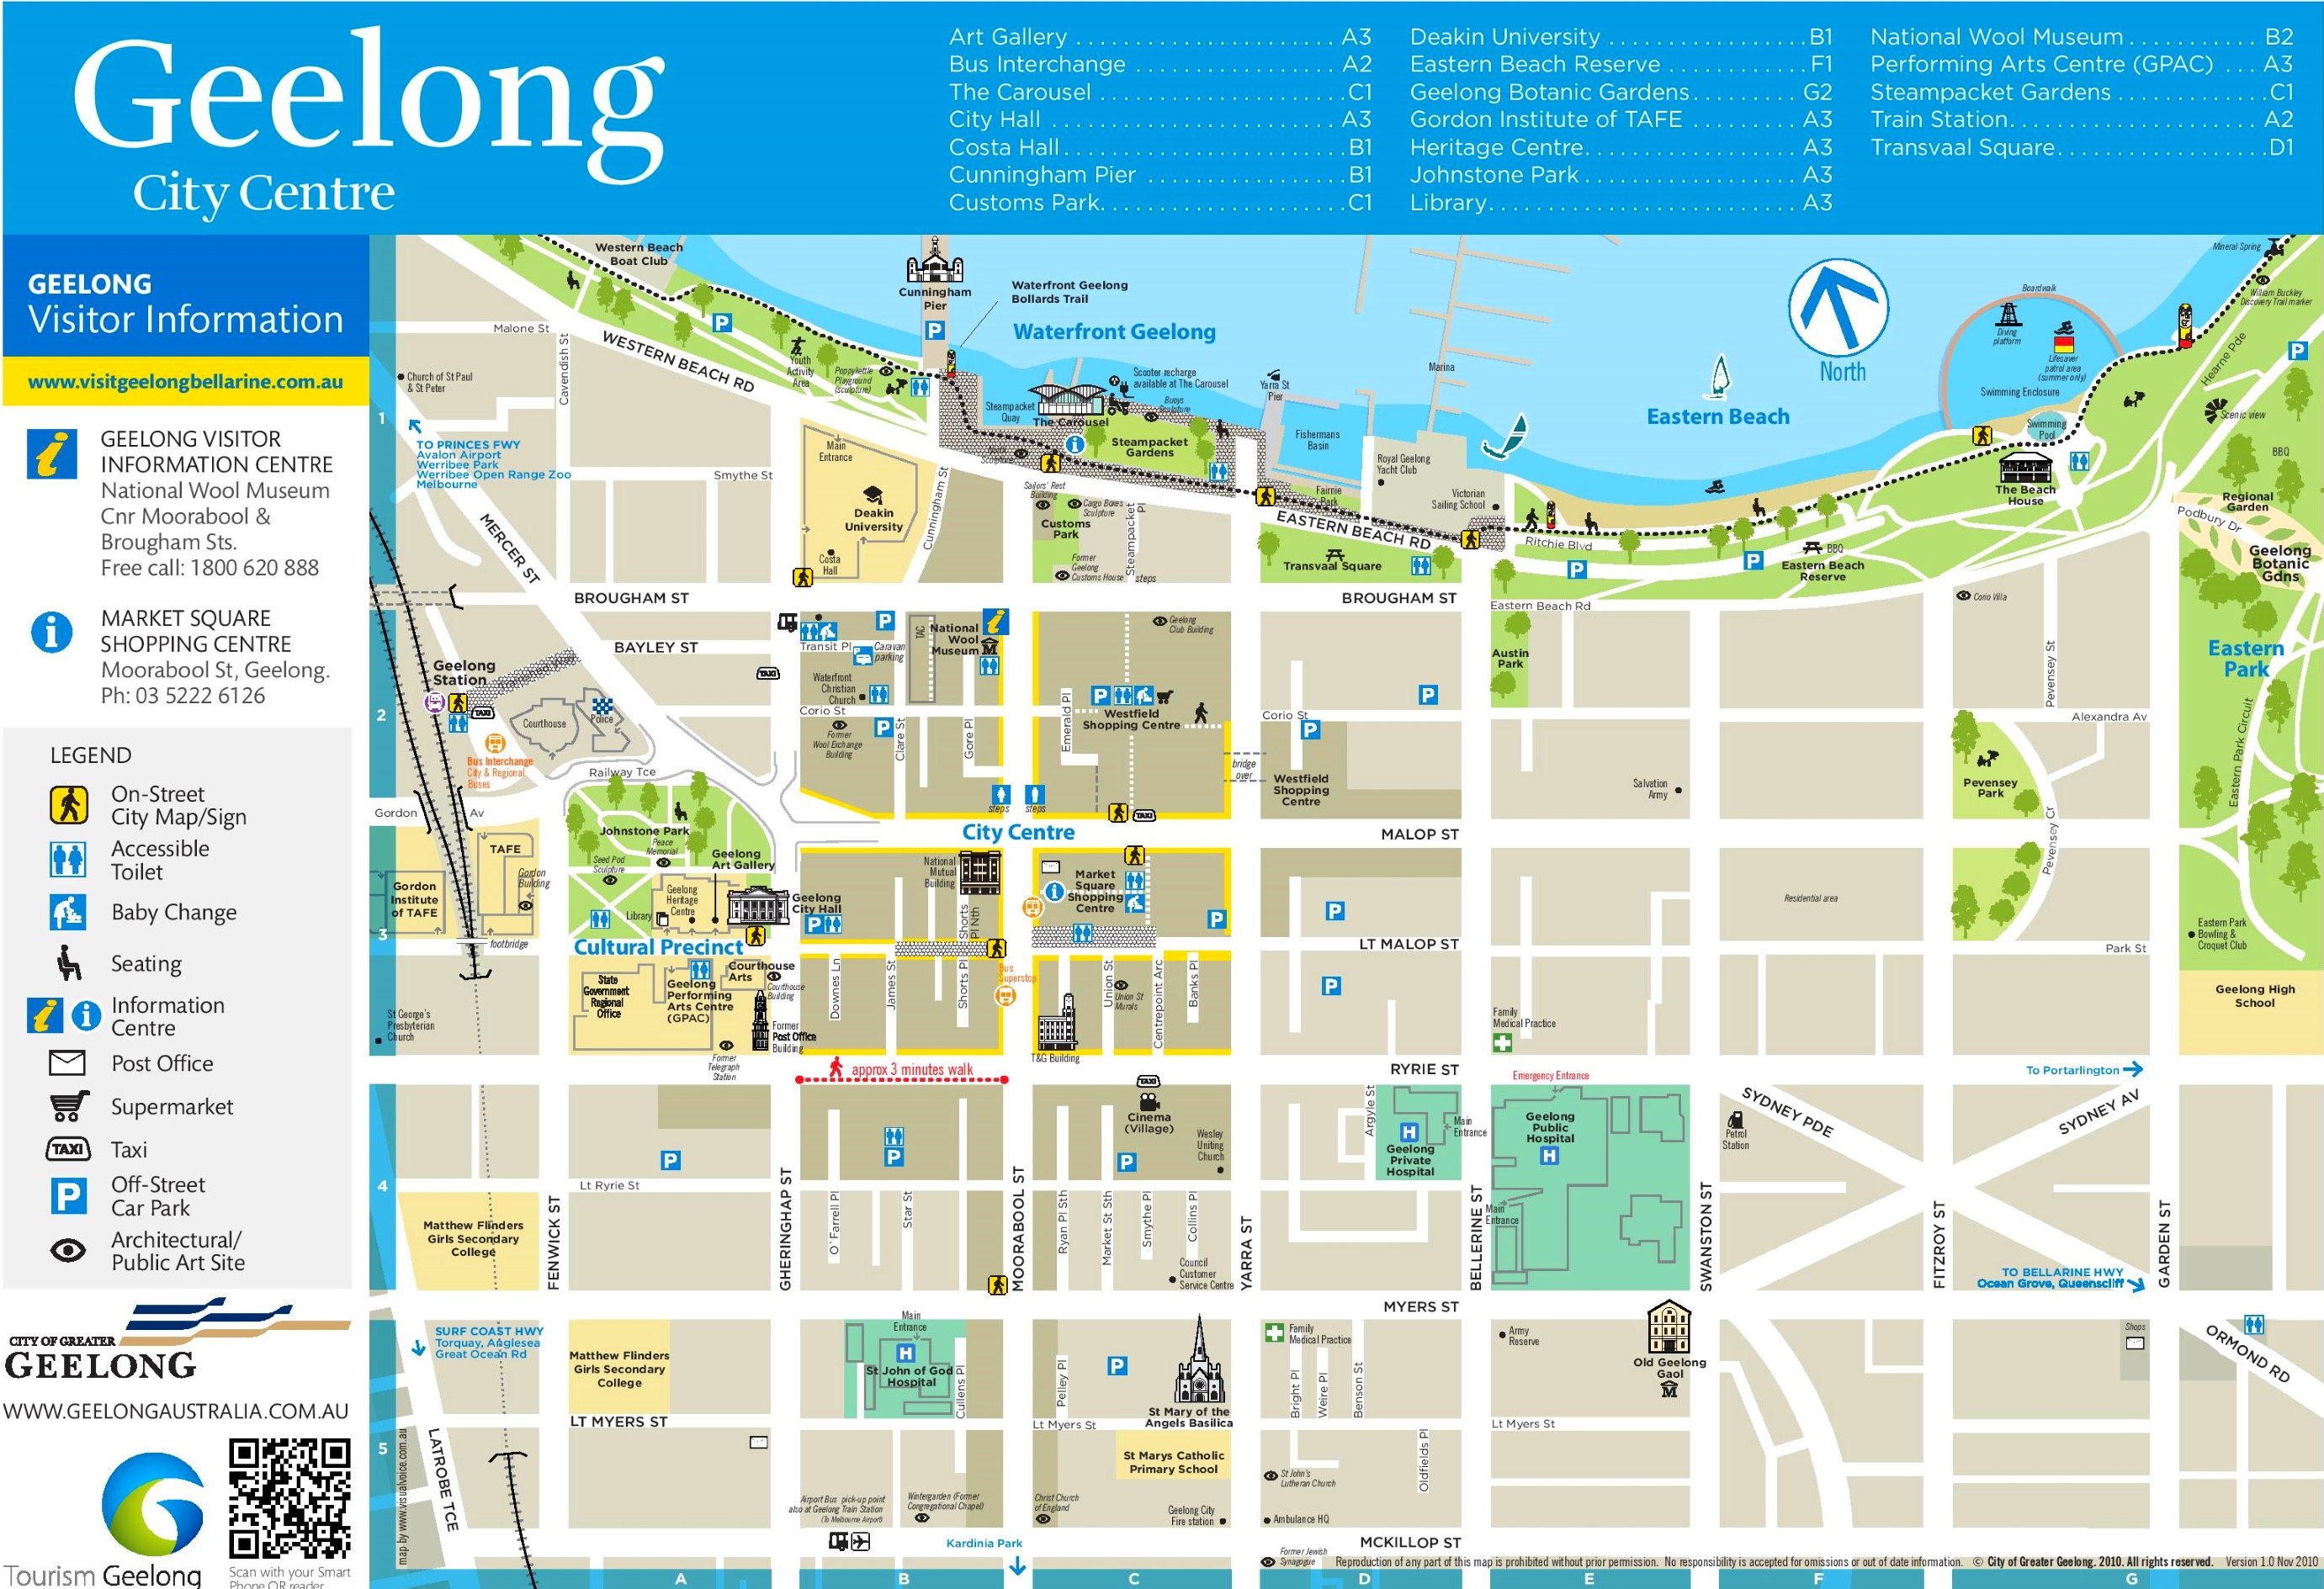
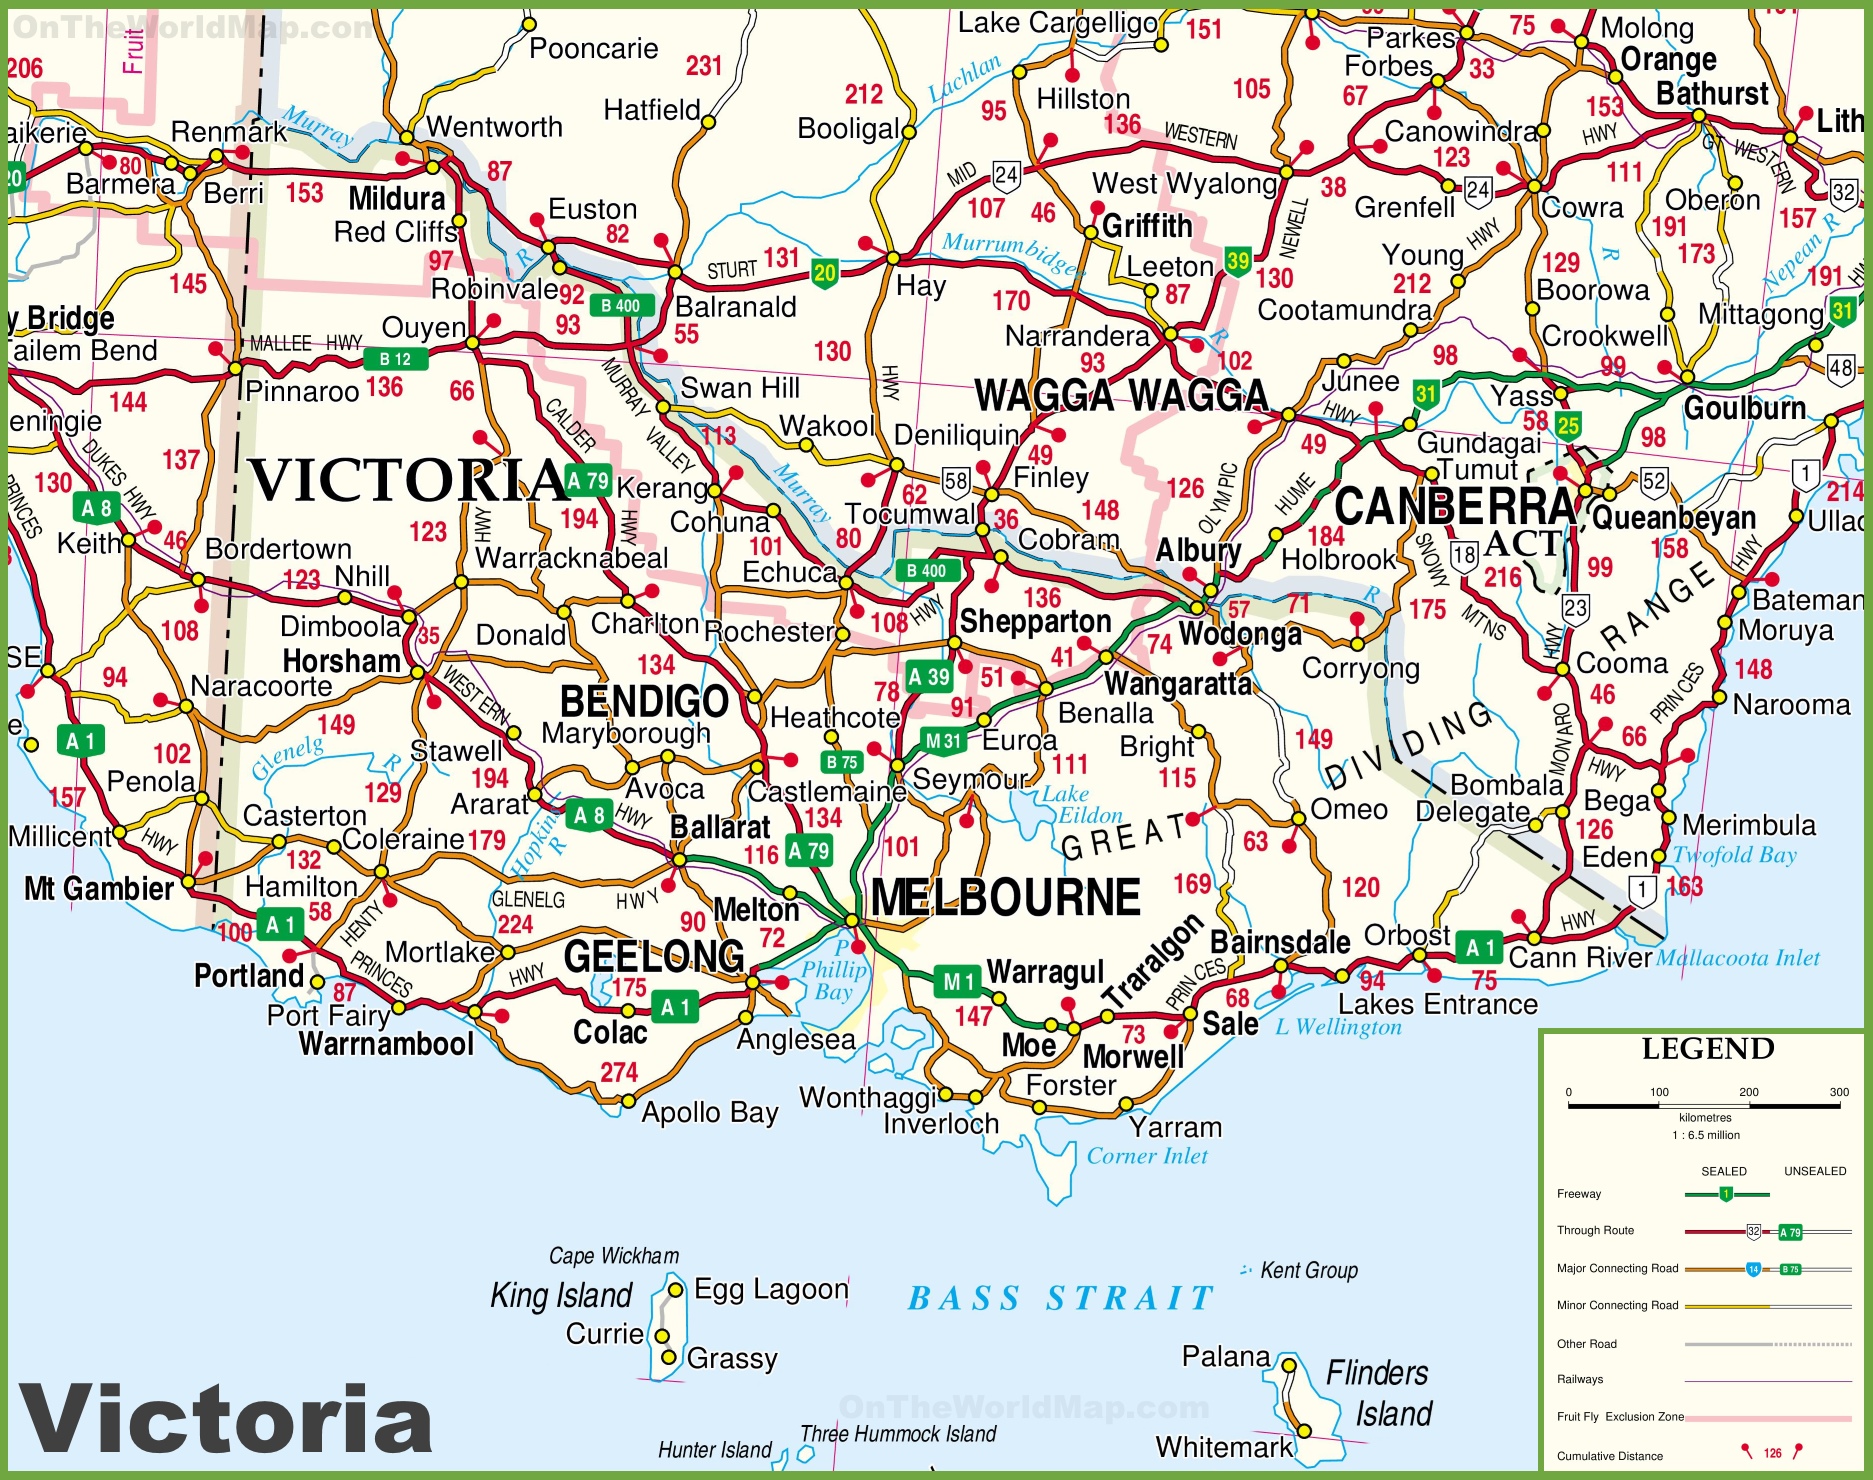
Today you will be working with a partner. You have visitors from interstate coming to visit Geelong. Where do you think would be the best places for them to visit? You can choose to either use this tourist map of Geelong and plan a day exploring the city, or this detailed map of Victoria for a longer explore of our state. (print maps beforehand)
Choose at least 8 locations and mark them on your printed map. (If you have time though, you will need to do more!) Plan your itinerary for their day by writing a list of directional statements to help them find the different locations. eg:
Group 1: Jack, Jess, Emz, Jade, James, Daniel
You will be working with the map of Victoria, and need to use the scale to calculate the approximate distance between the towns you are visiting. You will need a ruler for this task.
EG:
Group 2:
Choose at least 8 locations and mark them on your printed map. (If you have time though, you will need to do more!) Plan your itinerary for their day by writing a list of directional statements to help them find the different locations. eg:
Choose at least 8 locations and mark them on your printed map. (If you have time though, you will need to do more!) Plan your itinerary for their day by writing a list of directional statements to help them find the different locations. eg:
- From our home in Grovedale, head North West to ___.
- From there, travel South East to _____.
Group 1: Jack, Jess, Emz, Jade, James, Daniel
You will be working with the map of Victoria, and need to use the scale to calculate the approximate distance between the towns you are visiting. You will need a ruler for this task.
EG:
- From Geelong, travel North West for approximately 60 km to ___.
- From there, travel South East for 200km to _____.
Group 2:
Choose at least 8 locations and mark them on your printed map. (If you have time though, you will need to do more!) Plan your itinerary for their day by writing a list of directional statements to help them find the different locations. eg:
- From our home in Grovedale, head North West to ___.
- From there, travel South East to _____.
Lesson 5
LI: We are learning to understand scales, legends and directions to help interpret maps.
SC: I can use a scale on a map to determine the actual distance between locations.
SC: I can use a scale on a map to determine the actual distance between locations.
We are going to watch a clip with a song about map features. It is a bit corny... but pay attention as there are five important map features you need to notice in the clip. We will be discussing these after watching. (You may take notes if you wish!)
What are the five features mentioned in the song?
What is the purpose of all five?
How does that compare to this poster, which has 6 features?
What is the purpose of all five?
How does that compare to this poster, which has 6 features?
Today we are going to look more closely at map scales.
Activities:
Group 1: With Mr Blain
Sarah, Em. B, Josh, Owen, Jarvis, Logan, Nakita
Interpreting maps worksheet
Group 2:
Kya, Jayda, Connor, Matilda, Aiden, Paddy, Erika, Tahlia, Cam
Garden Plans - calculating simple scale questions.
Group 3:
Jack, Jess, Emz, Jade, James, Daniel
Complete this printed scales and maps task with a partner
Lesson 4
LI: We are learning to investigate the effect of combinations of transformations on simple and composite shapes.
SC: I can reflect and rotate shapes, explain what a tessellation is, and identify the shapes used to create tessellations.
SC: I can reflect and rotate shapes, explain what a tessellation is, and identify the shapes used to create tessellations.
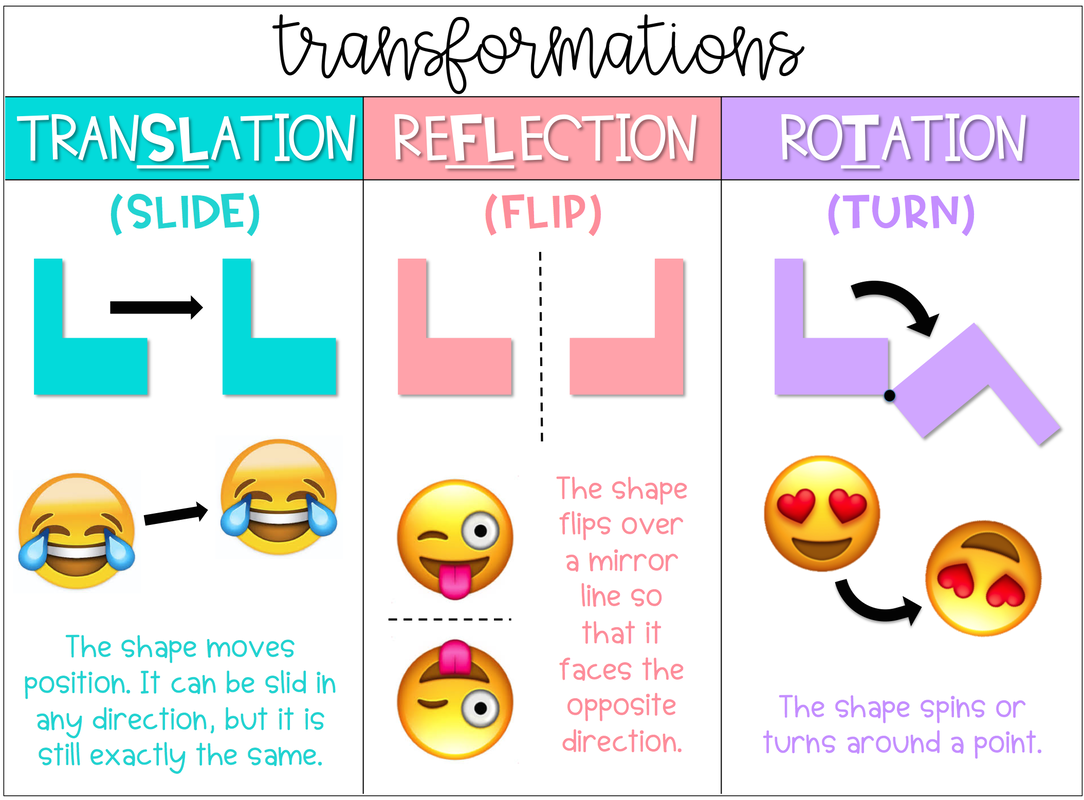
First half of the lesson: Practising reflecting and rotating.
To review the different types of transformations, let’s look at some of these Transformation Task Cards together.
Today, you are going to practise reflecting and rotating shapes.
Complete this worksheet to practise reflecting shapes.
Then move on to complete these Transformation Task Cards by saving them as pictures and inserting them into Book Creator (or another app that allows you to draw over the top of images). Draw your answers.
Today you are going to create your own tessellation. You could choose to create a simple pattern using one or two basic shapes, however if you are up for more of a challenge, you could make a more creative tessellation by altering a shape to make an interesting piece of art. Let’s look at this short tutorial together to see how to do this.
Lesson 3
LI: We are learning to translate, reflect and rotate 2D shapes.
SC: I can identify which transformation has been applied to a 2D shape, and draw the new shape after applying a transformation to an original 2D shape.
SC: I can identify which transformation has been applied to a 2D shape, and draw the new shape after applying a transformation to an original 2D shape.
Let’s read through this page together to find out what the word ‘congruence’ means. We will also complete the ten questions at the bottom of the page.
Are shapes congruent if they have been transformed using these three processes?
Let’s look closely at each type of transformation on this anchor chart:
Let’s look closely at each type of transformation on this anchor chart:
Activity:
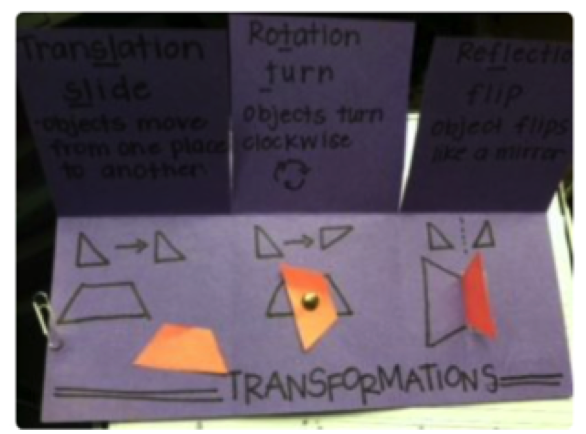
Today you are going to create a flip page to define and help remember the different transformations.
You will need: colour paper - one whole page, and some smaller parts for the shapes, one, paper clip, one split pin and a small piece of sticky tape.
Today you are going to create a flip page to define and help remember the different transformations.
You will need: colour paper - one whole page, and some smaller parts for the shapes, one, paper clip, one split pin and a small piece of sticky tape.
Finished? Watch this video on how to perform shape translations (just watch one or two examples)
Then: Complete this translation task: (printed)
Then: Complete this translation task: (printed)
Reflection:
Go through translation task together and correct work.
Go through translation task together and correct work.
Lesson 2
LI: We are learning to enlarge 2D shapes and explore the properties of the larger shape compared to the original.
SC: I can demonstrate how to enlarge a 2D shape, and demonstrate how the angles within the shape do not change.
SC: I can demonstrate how to enlarge a 2D shape, and demonstrate how the angles within the shape do not change.
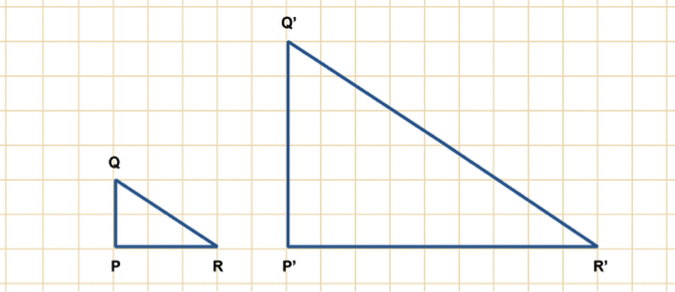
Enlargement of an object means to make it bigger or larger.
Have a look at these triangles - In this case we made the shape 3 times larger. The original triangle had a base of 3 units. The enlargement has a base of 9 units. Since 9 is 3 times larger than 3, we know that this triangle was enlarged by 3x.
All of the properties, such as the angles of the triangles, still remain the same after enlargement.
|
Let’s watch the first part of this clip: (only up until 2: 40) we don’t need to learn about the centre of enlargement, so just ignore when that is mentioned!)
|
|
Activity:
Today we are all going to start with the same task: completing this enlargements worksheet. Have a go at filling in the words in the paragraph at the top, to help make sure you understand the important information about enlargements.
We will go through the answers together.
Today we are all going to start with the same task: completing this enlargements worksheet. Have a go at filling in the words in the paragraph at the top, to help make sure you understand the important information about enlargements.
We will go through the answers together.
Early Finishers:
Once you have completed the worksheet and shown me, you may choose one of the printed enlargement drawings to complete.Make sure you closely copy what is drawn in each box on the grid to keep your enlarged picture accurate!
Ant
Lion
Dinosaur
Sailing Ship
Alternatively, if you would like to learn about the centre of enlargement, go back and watch the rest of the youtube clip that we watched as a class at the start of this lesson, then have a practise enlarging some simple shapes without using grid paper.
Reflection:
20 words - You have exactly 20 words to describe what you learnt from this lesson. No more, and no less! HINT: look at the LI and SC to help make sure you include the most important parts.
20 words - You have exactly 20 words to describe what you learnt from this lesson. No more, and no less! HINT: look at the LI and SC to help make sure you include the most important parts.
Lesson 1
LI: We are learning to identify line and rotational symmetry.
SC: I can identify lines of symmetry in a 2D shape, and explain what rotational symmetry is.
SC: I can identify lines of symmetry in a 2D shape, and explain what rotational symmetry is.
Warm Up:
Introduction:
Activity:
|
|
|
Use shapes and sticky tape, you are going to make shapes that have rotational symmetry, like in the clip you just watched. Be inspired by this video, but try to challenge yourself to make your shapes look different to the ones you saw! Make 2 shapes with rotational symmetry of order 2, two shapes of order 3, and two shapes of order 4. For each shape, trace it in your book and label with the orders.
Finished?
Have a go at the ten questions at the bottom of this page.
https://www.mathsisfun.com/geometry/symmetry-rotational.html
Have a go at the ten questions at the bottom of this page.
https://www.mathsisfun.com/geometry/symmetry-rotational.html
